Terraformでmodule利用時にデフォルト値と動的な値を設定する

概要

Terraformでmodule利用時にデフォルト値と動的な値を設定する。
例としてECSのタスク定義の環境変数を用いる。

バージョン

terraform -version
Terraform v0.14.3

コード

モジュール側

modules/hoge/variable.tf

variable "environments" {
  type        = list(object({ name = string, value = string }))
  default     = []
}

型変換は下記の通り
https://www.terraform.io/language/expressions/types#type-conversion

modules/hoge/main.tf

...
resource "aws_ecs_task_definition" "service" {
  ...
  container_definitions = jsonencode([
    {
      name      = "app"
      ...
      environments = concat([
       {
         name = "DEFAULT_ENV"
         value = "default_env"
       },
      ], var.environments) 
    },
  ])
  ...
}

リソース側

main.tf

module "fuga" {
  source = "./modules/hoge"
  environments = [
    {
      name = "ADDITIONAL_ENV"
      value = "additional_env"
    }
  ]
}

まとめ

https://www.terraform.io/language/functions/concat
を使うことでmodule利用時に動的に値を渡すことができる。

GitHub Actionsでmilestoneが適用されていないPRを検知する

概要

  • PRオープン時にマイルストーンがついているか検知する
  • ついていなかったらCIを落とす

を実現したかったが方法に難があるのでメモを残す。

マイルストーンとは
https://docs.github.com/ja/issues/using-labels-and-milestones-to-track-work/about-milestones

前提

結論

下記のようにgithub-scriptを使ってAPIをたたき、マイルストーンをチェックする。

name: Check Milestone

on:
  pull_request:

jobs:
  check-milestone:
    runs-on: ubuntu-latest
    steps:
      - name: check milestone
        uses: actions/github-script@v5
        with:
          script: |
            const { data } = await github.request("GET /repos/{owner}/{repo}/pulls/{pr}", {
              owner: context.repo.owner,
              repo: context.repo.repo,
              pr: context.payload.pull_request.number
            });
            if (data.milestone) {
              core.info(`This pull request has a milestone set: ${data.milestone.title}`);
            } else {
              core.setFailed(`A maintainer needs to set the milestone for this pull request.`);
            }

課題

milestoneをつけ直したときのイベントを検知できないので、GUIからCIを再実行する必要がある。
https://docs.github.com/ja/actions/managing-workflow-runs/re-running-workflows-and-jobs
手動で再実行は面倒なので、CIを落とさずに、コメントを残したりすることで一次対応できそう。

labelは下記のように検知できるが、milestoneは2021年12月現在は対応していない。

on:
  pull_request:
    types: [labeled, unlabeled]

2021/12/21追記

下記のようにコメントを書いて促すようにした。

name: Check Milestone

on:
  pull_request:

jobs:
  check-milestone:
    runs-on: ubuntu-latest
    steps:
      - name: check milestone
        uses: actions/github-script@v5
        with:
          script: |
            const { data } = await github.request("GET /repos/{owner}/{repo}/pulls/{pr}", {
              owner: context.repo.owner,
              repo: context.repo.repo,
              pr: context.payload.pull_request.number
            });
            if (data.milestone) {
              core.info(`This pull request has a milestone set: ${data.milestone.title}`);
            } else {
              github.rest.issues.createComment({
                issue_number: context.issue.number,
                owner: context.repo.owner,
                repo: context.repo.repo,
                body: 'milestoneがついていません:warning:'
              })
            }

GitHub Actionsからリリースノートの自動生成機能を使う

概要

GitHubにはリリースノートの自動作成機能がある。
.github/release.ymlをおいておけばそのフォーマットどおりにラベルをグルーピングしてサマリを作ってくれる。
Automatically generated release notes - GitHub Docs

yamlのサンプルは下記。
https://docs.github.com/repositories/releasing-projects-on-github/automatically-generated-release-notes#example-configuration

これをGitHub Actionsから使う方法を調べたので記録する。

結論

GitHub CLIを利用する。
全体は下記
.github/create-release.yml

name: crelate release

on:
  push:
    tags:
      - "v*.*.*"

jobs:
  build:
    runs-on: ubuntu-latest
    steps:
      - name: Checkout
        uses: actions/checkout@v2
      - name:  Create a release
        run: |
          gh api repos/${{ github.repository }}/releases -f tag_name="${GITHUB_REF#refs/tags/}" -F generate_release_notes=true
        env:
          GITHUB_TOKEN: ${{secrets.GITHUB_TOKEN}}

リリースノート作成のyamlはサンプルそのまま
.github/release.yml

# .github/release.yml

changelog:
  exclude:
    labels:
      - ignore-for-release
    authors:
      - octocat
  categories:
    - title: Breaking Changes 🛠
      labels:
        - Semver-Major
        - breaking-change
    - title: Exciting New Features 🎉
      labels:
        - Semver-Minor
        - enhancement
    - title: Other Changes
      labels:
        - "*"

上記の設定で、タグが打たれたときにリリースを作り、リリースノートを決まったフォーマットで自動生成することが可能。

Create Release APIにはgenerate_release_notesというオプションがあり、これをtrueにすることで、.github/release.ymlのとおりにリリースノートを作ることが可能。

最初はhttps://github.com/softprops/action-gh-releaseを使ってなんとかできないか検証していたが、APIを直接叩くことで解決した。

退職エントリ

概要

10月31日で現職を退職します。

プラットフォームチームでDevOpsやSRE領域の活動をしてきました。
(開発から運用までのワークフロー整備・改善など。)

チームメンバーや会社に助けていただいたおかげでここまでやってこれました。
とても優秀な方々に恵まれたなと感じています。本当にありがとうございました。

引き続き、DevOps、SRE、Developer Productivityなどの領域でがんばります。

GitHub Actionsのservice containersでCI実行時にMySQLコンテナを動かす

概要

GitHub Actionsのservice containersという機能を使うと、CI上でコンテナを動かすことができる。
ユースケースとしては統合テストや、マイグレーションテストが想定される。

About service containers - GitHub Docs

.github/workflows/test.yaml

name: MySQL Service Example
on: [push]

jobs:
  runner-job:
    runs-on: ubuntu-latest

    services:
      mysql:
        image: mysql
        env:
          MYSQL_ROOT_PASSWORD: pass
          MYSQL_DATABASE: test
        options: >-
          --health-cmd="mysqladmin ping"
          --health-interval 10s
          --health-timeout 5s
          --health-retries 5
        ports:
          - 3306:3306

    steps:
      - name: Check out repository code
        uses: actions/checkout@v2
      - name: Install dependencies
        run: npm ci
      - name: Connect to MySQL
        run: node index.js
        env:
          MYSQL_HOST: 127.0.0.1

index.js

const mysql = require("mysql2");

const test = async () => {
  const connection = await mysql.createConnection({
    host: process.env.MYSQL_HOST,
    user: "root",
    password: "pass",
    database: "test",
    port: 3306,
  });
  await connection.connect((err) => {
    if (err) {
      console.log(err);
      process.exit(0);
    } else {
      console.log("success");
      process.exit(0);
    }
  });
};
test();

結果

Run node index.js
  node index.js
  shell: /usr/bin/bash -e {0}
  env:
    MYSQL_HOST: 127.0.0.1
success

まとめ

service containersを使ってMySQLに接続するところまで確認した。
これでマイグレーションの差分確認やDB接続が必要なテストなどがCI上で実行できる。

参考

https://docs.github.com/en/actions/using-containerized-services/creating-postgresql-service-containers

Dockerfileのヒアドキュメントを試す

概要

docker/dockerfile:1.3.0-labsからDockerfileでヒアドキュメントがサポートされた。

https://github.com/moby/buildkit/blob/master/frontend/dockerfile/docs/syntax.md#here-documents

This feature is available since docker/dockerfile:1.3.0-labs release.

ざっくり経緯

  • RUN命令を何度も書くと不要なレイヤが増えビルド時間とイメージサイズの増加につながる
  • これに対し、&&と\を使ってまとめると見づらく、シンタックスエラーを誘発する

これらを解消するためにヒアドキュメントを導入する。

前提知識

BuildKit使ったことあるけどsyntax directiveを使ったことがない方

環境

docker --version
Docker version 20.10.7, build f0df350

動作検証

Dockerfile

# syntax=docker/dockerfile:1.3-labs
FROM ubuntu
RUN <<EOF
apt-get update
apt-get install -y nginx
EOF

ビルド

docker built . -t hoge

確認

docker run -it --rm hoge nginx -v
nginx version: nginx/1.18.0 (Ubuntu)

問題なくnginxがインストールされていることを確認。

syntaxについて

# syntax=docker/dockerfile:1.3-labs <--
FROM ubuntu

syntaxとは

https://docs.docker.com/engine/reference/builder/#syntax
BuildKitではDockerfileをビルドするための仕組みをDocker Imageとして配布している。
そのイメージを指定する機能。

docker/dockerfileとは

https://hub.docker.com/r/docker/dockerfile

Official Dockerfile frontend images that enable building Dockerfiles with BuildKit.

BuildKitでDockerfileをビルドするための公式Docker Image

xxx-labsとは

https://docs.docker.com/engine/reference/builder/#syntax

The “labs” channel provides early access to Dockerfile features that are not yet available in the stable channel. Labs channel images are released in conjunction with the stable releases, and follow the same versioning with the -labs suffix

アーリーアクセス機能

参考

公式ブログは下記
https://www.docker.com/blog/introduction-to-heredocs-in-dockerfiles/

ヒアドキュメントとはなにか
https://en.wikipedia.org/wiki/Here_document

まとめ

ヒアドキュメントを試すついでにsyntax directiveについてまとめた。
VSCodeシンタックスハイライトはヒアドキュメントに未対応。

https://www.docker.com/blog/introduction-to-heredocs-in-dockerfiles/

For now, they’re still only available in the staging frontend, but they should be making their way into a release very soon

もう少し待ってstableになってから使うという判断でよいでしょう。
Locustで時間に応じて一定のRPSをかける

概要

Locustで時間に応じて一定のrpsを流す

結論

constant_pacingとLoadTestShapeを利用する。

バージョン

  • Locust v1.6.0

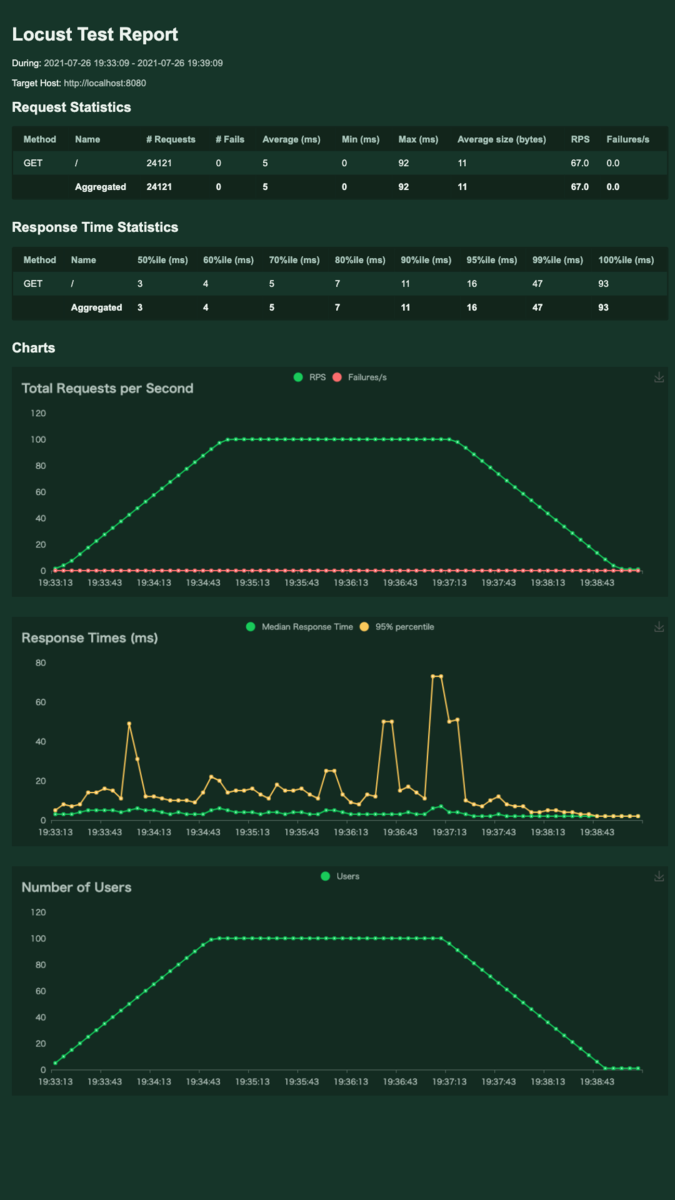
  • 120秒かけて0->100rpsまで上げる
  • 120秒間100rpsをかける
  • 120秒かけて100->1rpsまで下げる

1秒に1回タスクを実行するようにして、ユーザ数を増やしていけば目的のRPSを達成できる。

from locust import HttpUser, task, constant_pacing, LoadTestShape

class CustomShape(LoadTestShape):
    stages = [
        {"duration": 120, "users": 100, "spawn_rate": 1},
        {"duration": 240, "users": 100, "spawn_rate": 0},
        {"duration": 360, "users": 1, "spawn_rate": 1},
    ]

    def tick(self):
        run_time = self.get_run_time()

        for stage in self.stages:
            if run_time < stage["duration"]:
                tick_data = (stage["users"], stage["spawn_rate"])
                return tick_data

        return None


class GuestPcUser(HttpUser):
    wait_time = constant_pacing(1)

    host = "http://localhost:3000"

    @task
    def task(self):
        name = self.host

        self.client.get("/",)

結果

f:id:mMQnaZ7vL2DWkoU:20210726194836p:plain
Locustのレポート

参考情報

https://github.com/locustio/locust/issues/277#issuecomment-812831204
https://docs.locust.io/en/stable/api.html#locust.wait_time.constant_pacing
https://github.com/locustio/locust/blob/master/examples/custom_shape/stages.py